Wednesday, September 22, 2010

The shower doors have got to go!


When I purchased my townhouse there were a few decor elements that I wouldn't have necessarily chosen, one of which was glass doors in the bathroom showers.  I'm sure a lot of people love these things, I am not one of them.

Ick!

Of the past two owners, I don't think anyone wanted to take on the task of removing the shower doors in the bathrooms.  Maybe they thought it was going to be a more intensive task than it was.  All I know is, the doors were absolutely hideous and they had to go!

I did some research online and most posts assured me that the removal shouldn't be too bad or take too long, unless the doors were installed incorrectly.  So, I crossed my fingers and went for it.   I figured that if I ruined the tub, I'd just get a new one since I want to do some additional work to the master bath anyway.

I started the demolition at 10PM one evening; I just couldn't stand the the doors anymore! After finagling with one of the doors, I was able to lift it off of the top rail and remove it completely.  The other door, however, was attached to the bottom rail with two screws.  After fighting them for a little while, I was able to free that door as well. Next, I popped the top rail off (by far the easiest part!) and started to remove the six screws (3 on each) that held the side rails in place.  The side and bottom rails were unfortunately attached to the tub with latex caulking.  After a good bit of slicing with a razor blade and prying with a caulk remover tool, I was able to remove all of the rails.  Unfortunately, they left behind a lot of the caulking, which wasn't the easiest to remove. At first I thought the bottom rail had completely destroyed the tub because of the black patch I found that appeared to get worse as I scrubbed at it.  I did find out by accident that rubbing alcohol breaks the caulk down, so the spot came up with ease, thank goodness! Once the caulking was all cleaned up, I was able to cap off the holes that remained in the tub wall from the screws.  Job mostly done!

Add a shower rod and curtain and presto!
Note: Bathroom makeover still in progess!

 The guest bathroom's shower wasn't used nearly as much as the master one, so it was a lot easier to clean up.  I'm so glad I don't have any icky shower doors that are impossible to fully clean anymore!

Monday, September 13, 2010

A craft command center like no other...

It seems as though I've never had a desk big enough to work on all of the crafts that I seem to get myself into or enough storage space for all of my materials.  So, I started to shop around for a new desk for my craft room, but still couldn't find exactly what I was looking for.  I'm sure you know where this is going... I decided to take of the task of building one myself.  Hey, how else do you get exactly what you need?
 
There's been a trend lately of cube bookcases; many different brands manufacture them most notably- Closetmaid.  Being that space is a concern (I share my craft room with the "office") I knew from the start that I wanted to use the cube bookcases (I ended up with the 2x3 units- $40 each) to add storage below my desk while serving as a base for the desktop. I love things that serve dual-purposes!

I count myself lucky to live a mere five miles from an Ikea.  Why do I love Ikea?  Well, for someone like me that needs to put my own spin on everything, their cost-effective (a.k.a. cheap) products allow me to push my creative limit without fear of wasting too much money if the end result is not what I was hoping for.

As far as desks, Ikea has started to sell pieces of desks, specifically different size tops and legs, that allow you to customize. I wanted to maximize the available space by creating an L-shape desk. To do so, I attached two different-sized desk tops together, securing with some steel brackets.  I also purchased two sets of 6 inch legs, total expenditure of about $40.  


So, as you see above, I turned the bookcases on their sides and added the 6in legs from Ikea to the top to create some additional storage and to raise the height of the desktop so that I could work from a standing position as well.

Now, of course, I can't stand a plain white desk, so the next step was to customize some doors to add some color. It was important to me to make sure that however I chose to customize the desk it would not be permanent.  I change my mind and my style a lot.  I knew it would be easier to simply peel a temporary cover off of each door rather than to scrape and sand whatever design. 


I ended up using 3M's spray adhesive, which is permanent if you adhere both surfaces immediately, or temporary if you let the sprayed surface dry slightly before affixing it.  Because the doors are around 11 inches tall and wide, I was able to use standard 12x12 scrapbook paper to adorn the doors. I chose to use a different design for each door, but stuck with a teal blue theme for a unified look.  You can see my high-tech spray booth above.

One of the finished doors with the door pull attached.

The process was a bit tedious, as each door needed to be wrapped and the corners glued to ensure a smooth finish.  After about 2 hours I had all 6 doors done and attached to the book cases.  I'm really happy with the final result! The total cost for this custom desk was around $150, so not too bad. 


I've added a few more baskets since this picture was taken to help organize some of my high-demand supplies.  All in all, it's a perfect craft command center for me, now I just need to get to work doing some more crafting!

Thursday, August 26, 2010

What's your "Crafting POV"?

If you've ever seen Food Network's "Next Food Network Star" you'll know that the judges are always hounding people to figure out what their culinary point of view is, but why? Well, because that's what makes a consistent and lasting brand.  A person's POV drives their creations and ultimately their success because all of their ideas are based around this core belief.

The "POV Theory" has really come into play in my life lately.  As you may, or may not, know, I've been considering starting a small Etsy business, so that I can share my craftiness with others and hey, if I can make a buck or two, that'd be pretty sweet!  I have so many ideas of things that I could make running through my head, it's quite dizzying.  So to get a handle of where I should start, I focused on why I began crafting in the first place.

A lot of the reason my crafting obsession started was that I often see a design or idea in my head, but can't find anywhere to get it, so I'd make it instead.  I have always liked having things that I know no one else has. I like things that are, well, Simply ME. 

That epiphany resulted in the title of this blog, as well as my Etsy business (coming soon!)  Simply ME is as much about allowing me to craft and create my own designs, but to also provide my blog readers and my customers the opportunity to take what I've done and really make it their own.  At the end of the day, I'd want someone to think "this is simply me" and be referring to themselves.

I think I've always known all along what my crafting POV was, but now being able to put it into words and to own it- I feel that I have better direction for my Etsy future. 

So, stay tuned as this venture unfolds!  (If house decorating calms down, items should be listed in September.)

Tuesday, August 17, 2010

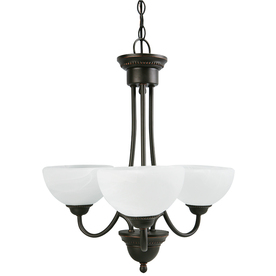
I got a chandelier for free!

Well, sort of anyway.  How did I do it?  I managed to flip one item to buy another, which was really easy! You can do it too, you just have to be on the lookout for a good deal.

Despite my first home being considered "move-in ready," I have to put my own stamp on the place.  Is anyone surprised by this? Well, I decided that I wanted to spruce up some of the fixtures, cause honestly, the original 18-year old brass chandelier that is currently marring my dining room has got to go.  The boyfriend and I have been looking for a while and trying to decide what we want. Well, we had finally decided on this nice modern one from Lowes.

Photo borrowed from Lowes.com

So, despite really liking this one, we've still been looking at other options until we get to the point that we've finished the rest of the dining room. (Which will be this weekend, most likely) Well, during a recent shopping trip with my mom at Lowes, I found this $198 chandelier for, get this, $20!!

Yeah, not a typo there, it was really only $20. Not sure how this fixture made it through two price reductions, but hey I recognize a good deal when I see one!  I really didn't want a traditional style chandelier, but I liked the scroll work so I figured I'd give it a try.  Unfortunately, the picture on the box is very deceiving- this chandelier is huge and way too big for our dining room, especially when placed over a gathering-height dining table.

So, being the businesswoman that I am, I decided that instead of returning the chandelier to Lowes, I would sell it on Craigslist. (People will buy anything, really.)  All I wanted was to make enough money to cover the cost of the fixture that we liked, a mere $56 bucks after using a coupon Lowes sent us.  Now, there are a lot of chandeliers on Craigslist in the Pittsburgh area, so I wasn't sure if listing it for $90 would get any interest.  Well, within the first day I had a woman who wanted it and wanted it immediately! 

I've covered the cost of the original chandelier, have enough to buy the chandelier I want, and have pocketed an additional $14. I'll definitely be keeping my eyes out for more bargains that I can flip on craigslist.  Who knows, maybe I'll be able to decorate some other rooms for free :)

Monday, August 9, 2010

Remind me why I paint rooms...

It seems that every time I paint a room, I remember what a chore it really is and how long it actually takes.  So much so, that I never want to paint again.  But then a few weeks or months or even years go by and I forget my disdain for painting and I am right back in there, brush in hand.

Well, Sherwin Williams had a 40% off sale on Saturday, which I could not pass up.  I love Sherwin Williams paint, it is a far superior quality to what you get at a big box store.  But that quality also comes at a hefty price, so when you see a 40% off sale, you jump on it! 

I've been staring at my living and dining rooms walls for the past month, loving the color one minute, hating it the next.  These rooms are a mystery to me, depending on the light and time of the day, the walls (which are a dark yellowish green) either look more blue or more yellow.  The worst part about the color is that when the sun goes down it is extremely dark in there.  (The dark flooring doesn't help that much, either.)

So, I decided to lighten the green up (yep, I painted over one green with a different green). My townhouse has an open layout, so the living room and dining room don't have a full wall of separation, but just columns.  I wanted to make the spaces feel more distinctive, but to still flow, so I've decided to keep the previous green on the lower 1/3rd of the wall in the dining room and repaint the entire living room and the top 2/3rds of the dining room with a lighter color.  Once that's done I'll install chair rail between the two colors in the dining room.  I chose a pretty color called "Clary Sage" and it goes well with the current dark green. 

Painting in progress
I have a coat of paint up so far, which took me just about 6 hours by myself.  Hopefully this week I'll muster the motivation to finish the 2nd coat.  I hate having furniture misplaced so I'm sure it'll get done soon so that all can go back to normal!


Check back soon for the final "After" pictures when I get the chair rail in place and some stuff on the walls!

Thursday, July 29, 2010

Wow... It's been awhile

So, no- I didn't forget about my blog and just disappear for days, weeks, okay well almost a month. Where have I been? Well, I bought a house. A townhouse, actually.  With 3 bedrooms, 2.5 baths, a living/dining room and kitchen to decorate, I have been preoccupied.  Sad to say, I've been in the townhouse for 3 weeks now and I still don't have a dining room table (oops) but it's been ordered so it should arrive any day now.

The best part of buying a house? Definitely gives me more excuses to be crafty and I plan to be over the next several months because there's much left to do.  I've started to create my "Craft Command Center" which is taking over 2/3rds of the bedroom that we chose to be the "office."  Poor boyfriend has his desk and a shelf and that's it, everything else shall be devoted to my craft supplies which may very well rival Joann's and Michael's (okay, so not really, but I have way too much which I realized when I had to move it!)

So, here's a few things to look forward to in the next few posts:

  • Building my craft desk (yep couldn't bring myself to buy something stock, had to create my own)
  • Creating massive amounts of wall art
  • Decorating!
So stay tuned!

Wednesday, June 9, 2010

What if someone already got her that...

Well, my boyfriend and I were recently invited to the first birthday of friends' daughter.  After toiling over toys for hours at Toys R Us, worried about duplicating the gift of someone else, I decided that I wanted to make something personal for both Kaitlyn Elizabeth and her parents.  I wanted something that I knew no one else would give her.  We did end up also buy her toys, but I am extremely proud of how the gift I made turned out.  Take a look...


I love the look of floating frames, but I had never bought any for my own decor (after this project that quickly changed, I know have 3).  So I decided that I would personalize the frame with her name, a photo, and a quote.  One of my favorite quotes is "Live Well, Laugh Often, Love Much," which worked perfectly. Honestly, is there any better wish for a child than that?  Using my Silhouette, I quickly and easily cut her name and the quote from black vinyl and used the transfer paper to apply the vinyl to one of the glass panes of the frame.

I found an adorable picture of the birthday girl and used PS Elements to turn it into a black and white photo with only her gorgeous blue eyes colored. I mounted the picture on a blue cardstock with a slight sheen to help Kaitlyn's eyes pop, and added a blue polka dot ribbon to tie it all together. Here's a close-up of the photo:


The great thing is Kaitlyn's parents can change the picture whenever they wish as the floating effect is created by sandwiching the photo between two panes of glass. I also made sure to place the vinyl between the glass panes as well so it will be easier to clean without worry of the vinyl peeling off.

I'm ecstatic at how this turned out and already have a triptych planned for the stairwell of my townhouse using these floating frames, and well, probably the same quote.  I told you it was my favorite...